Disclosure: Adam’s Garden of Eatin’ participates in affiliate marketing programs. There are some affiliate links below and I may receive commissions for purchases made through links in this post, but these are all products I highly recommend. I won’t put anything on this page that I haven’t verified and/or personally used.
If you are a steady hunter, at some point tried you’ve tasted, some style of jerky. Homemade or Prepackaged. Wild game or Beef. Sweet or Spicy. Smokey or Savory. The list of options is vast.
Have you tried duck jerky yet? Duck jerky is one of my top personal reasons for going duck hunting. What started as a successful cooking experiment, has changed my whole thought process towards duck hunting. I duck hunt for the jerky now. That’s it. It’s that cut and dry. I can’t make duck jerky unless I shoot the ducks, and I can’t shoot the ducks unless I go hunting. Pretty simple. Hunting equals jerky. Here’s how I make it.
Step 1 – Thaw It.
Thaw your frozen duck and/or goose breasts. I use goose breasts the same way as duck breasts. I get a few more slices of meat since they are bigger than a duck breast and I can’t tell any difference in the taste of the final product.


Step 2 – Slice It.
Get to slicing. You’re looking for uniform slices as best you can. I found a duck breast is a little too small to slice easily on my commercial slicer. This smaller model works perfectly for duck breasts. Perfect even slices. But nothing is stopping you from busting out those knife skills. Just try to keep your slices uniform. Different thicknesses in slices can result in uneven cooking times.

Step 3 – Marinate It.
Ingredients List (S.W.A.G measured)
Pink Curing Salt (just a little bit)
Meat Tenderizer (just a little bit)
2-3 Cups of water
I can’t honestly say I really don’t measure anything when I make jerky. I just do a taste and smell taste as I go. Then I adjust accordingly. Do you want it hotter? Add more spice. Do you prefer it sweeter? Add more sugar. Don’t like a certain spice? Leave it out. The jerky marinade is really decided by your personal taste. You do you.

You can marinate in whatever container you choose. A freezer bag works just fine. I prefer to be a little fancier and marinate in my FoodSaver container. It allows me to vacuum all the air out of my container while it marinades. This allows the marinade to penetrate the meat quicker and speeds up the marinade time. I leave my meat to marinade for 24-36 hrs. I think the extra marinade time adds a more intense flavor in the end. It’s also great for resealing mason jars with the extra lid attachments. It allows me to revaccum seal jars that I don’t completely use.

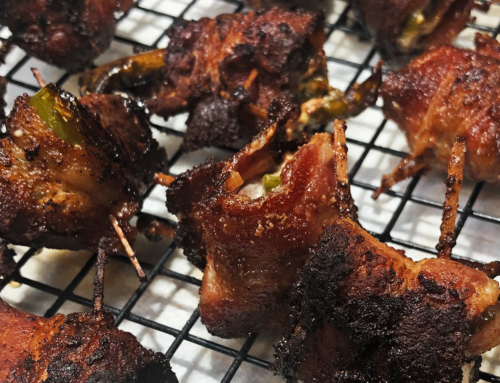
Step 4- Rack It.
I place my jerky on each level of my dehydrator. Make sure to leave 1/4” – 1/2” space between each slice of meat. Overlapping jerky pieces can lead to uneven dehydration in your final product. I cringe when I bite down a chewy fatty piece of jerky that didn’t dehydrate evenly. Once I have positioned my meat, I sprinkle rosemary over the top, flip and sprinkle on the other side. I do this until all my racks are full of rosemary-coated duck jerky slices.


Step 5 – Dry It.
Every dehydrator is different. There are dozens of different models with different settings and gauges. You can choose whichever one fits you best. Your cooking time might vary according to your model, so read your manual before you go making duck chips instead of jerky.

My dehydrator is old and simple. All it has is an on and off switch. That’s it. No temperature controls or timers. Just turn it on and turn it off when finished. Admittedly a timer would be nice, but I’m not complaining. For a full load of jerky, I run my dehydrator for 7-8 hours. Usually, overnight while I sleep.
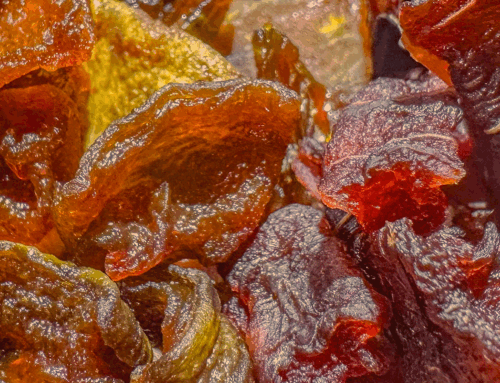
Step 6 – Bag It.
Unload your dehydrator and enjoy. A freezer bag works great for easy snacking access. I recommend adding some oxygen absorbers to your bag. Just in case there’s a hidden piece that didn’t properly dry all the way. I’ve had whole batches grow mold because I missed a spot before bagging. If you’re really OCD, you could measure out snack bags and vacuum seal them. That way they are ready to throw in your game bag for your next hunt.


OMG! I am drooling just reading the recipe. YUM! Hey, look over there! (sounds of someone eating) lol
This sounds so good! I now need to buy a dehydrator!
At first, i thought the duck breast was liver. My first-time seeing duck breast meat. But love beeg jerky and i am sure this is as delicious 😋
I believe other website proprietors should take this internet site as an example , very clean and excellent user friendly pattern.